Image acquisition, quality control, and complementary techniques
A useful capillaroscopy study depends on the final photograph, but the success of that photograph depends completely on a chain in which no link should fail: patient preparation, control of the environment, which fingers to examine and in what order, immediate quality review, and traceable documentation. Most important errors appear before image interpretation, during acquisition [1, 2, 3, 4, 5].
- The room, acclimatization, hand position, and pressure from the device head can change the image as much as the hardware itself [1, 2, 4].
- When classifying systemic sclerosis patterns, examining eight fingers, excluding thumbs, and covering medial and lateral areas reduces information loss [2, 3, 10].
- The distal capillary row is the target of analysis; capturing outside that row or with excessive compression creates avoidable errors [1, 4, 5].
- Quantification only makes sense if the image is evaluable, correctly identified, and the length analyzed (precise physical distance calibration) and the sectors actually assessed are known [1, 6, 9, 10].
- Thermography and other functional techniques can provide complementary answers, but they do not replace standard morphological capillaroscopy [1, 7, 8].
Learning path
If you want to perform useful and transferable studies, this unit explains the preparation, scan route, and quality controls you need. This training will help you distinguish normality from artifact (see normality and variability in Unit 3.1).
Patient and Environment Preparation
Acquisition already "starts" before the device touches the finger. If the thermal environment is unstable or the patient has recent vasoconstrictor factors, the image may be technically correct but clinically misleading.
| Pre-capture variables | Practical recommendation | Why it matters |
|---|---|---|
| Room temperature | Maintain a stable range, usually around 20-25 °C [2, 4] | Reduces reflex vasoconstriction and avoidable variability |
| Acclimatization | Prior rest, typically at least 15 minutes [2, 4] | Allows perfusion closer to the patient's real baseline |
| Manicure, nail polish, trauma | Inspect the cuticle and avoid recent manipulation when possible [1, 4, 5] | Reduces artifacts and traumatic hemorrhages |
| Posture and support | Relaxed hand, well supported and at a comfortable height | Improves stability and reduces accidental compression |
| Pre-test instructions | Avoid immediate cold exposure, smoking, or caffeine just before the test if feasible [4] | Reduces functional bias, especially in highly reactive Raynaud's phenomenon |
In practice, not every center will be able to control every variable identically, but suboptimal conditions should still be documented. This simple note can change interpretation: apparent low density in a well-acclimatized patient is not the same as an image obtained with cold hands just after arriving from the street in winter.
A common example is the patient with severe Raynaud's phenomenon who arrives in a hurry, without time for acclimatization, and with hands still pale. If the study is performed at that moment, visibility may be poor and functional loop collapse may be documented, without necessarily reflecting advanced structural damage by itself. Repeating acquisition after rest can substantially increase the usefulness of the examination [4, 5].
Step-by-Step Capture Protocol
The best defense against sampling bias is to always follow the same system. Operators who improvise the number of fingers, areas, or captures end up generating studies that are difficult to compare.
Step 1: prepare the nailfold bed
Apply enough immersion oil or gel (for example almond oil or mineral oil) to reduce reflections and improve superficial transparency [1, 4]. The film should be thin and homogeneous. If it is too sparse, specular highlights hide capillaries; if it is excessive and poorly distributed, it can make focusing harder or create a "washed out" image.
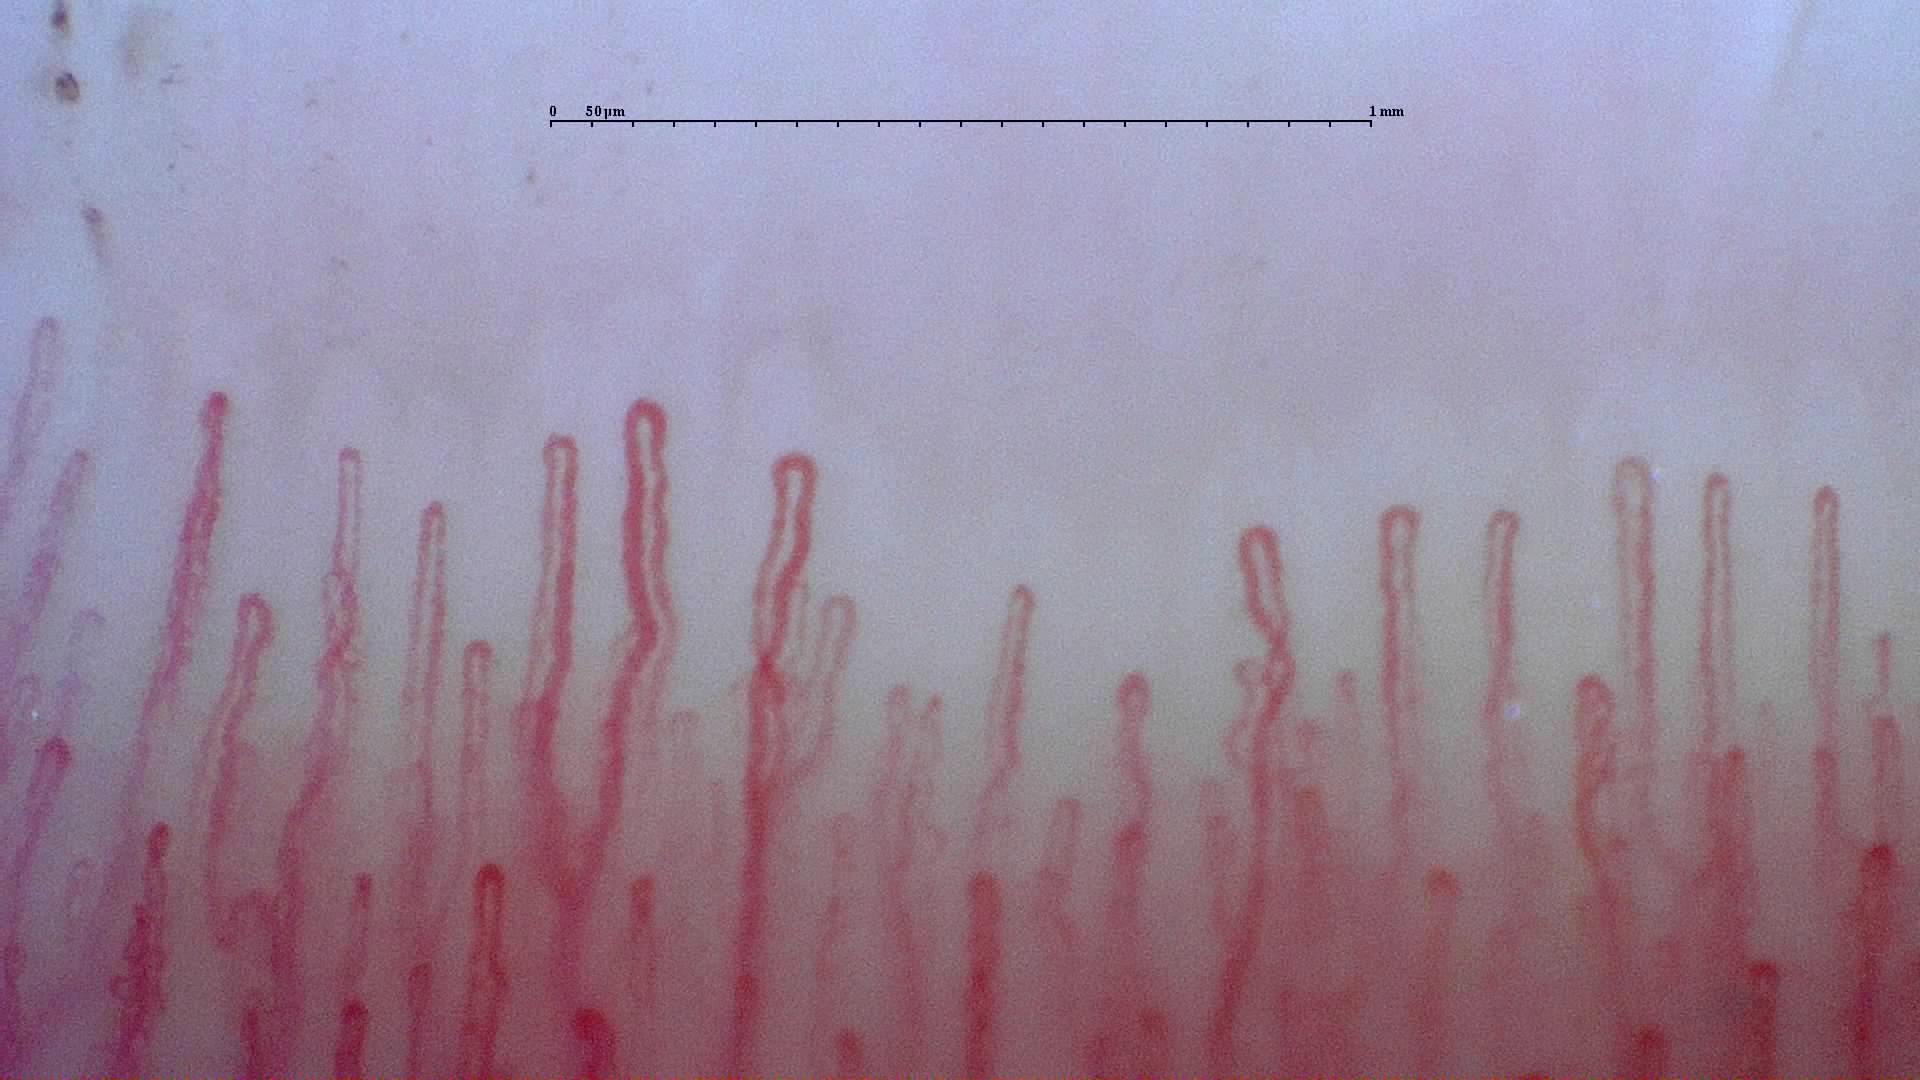
Step 2: locate the distal capillary row
Analysis should focus on the distal capillary row. This seems obvious on paper, but in hands with irregular cuticles or several partially visible rows it may be less straightforward [1, 4, 5]. Before saving images, spend a few seconds confirming that you are actually viewing the useful row and not a more proximal area.
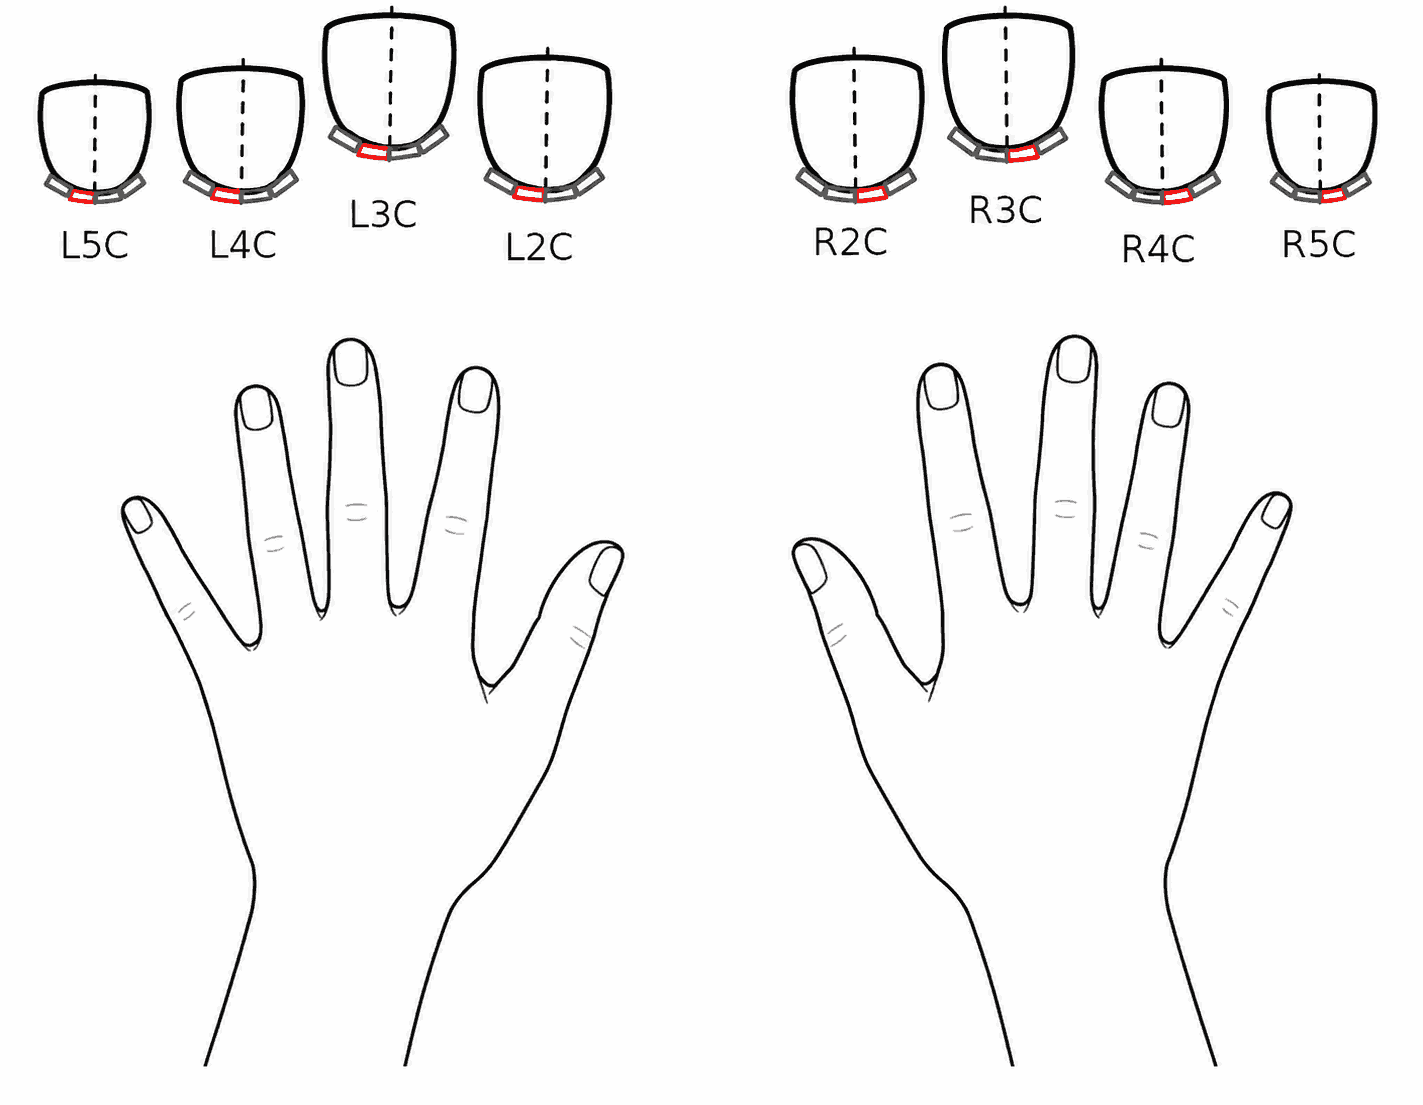
Step 3: scan eight fingers systematically
The recommendation best supported by evidence remains to examine eight fingers, excluding thumbs [2, 3]. Dinsdale et al. showed that reducing the number of fingers examined decreases the ability to detect abnormality, especially in early or heterogeneous disease [3]. The multicenter study by Guillén del Castillo et al. added that, to reliably classify the systemic sclerosis pattern, it is also important to scan both medial and lateral areas: compared with the gold standard of 32 images, using 16, 8, or 4 images produced discrepant results in 26.7%, 36.6%, and 41.5%, respectively [10]. In real clinical practice, this means that a "quick" examination limited to a few fingers or fields may be falsely reassuring.
The most practical approach is to keep a fixed order, for example from the fifth to the second finger on one hand and then repeat the same pattern on the contralateral hand. This apparently minor detail improves agreement between operators and makes the image collection more homogeneous.
Step 4: capture contiguous images and review them immediately
There is no universal number of images for every clinical question, but there is one rule: cover the first capillary line of each target finger with contiguous images [4, 5]. If the aim is to classify a scleroderma pattern with confidence, 2026 evidence supports complete acquisition of 32 images, with four fields per finger in the eight non-thumb fingers, and discourages partial sampling [10]. Each image should also be reviewed immediately so that it can be repeated if it is out of focus, poorly centered, or compressed.
| Step | Action(s) | What to avoid |
|---|---|---|
| Apply immersion medium | Use enough but not excessive medium [1, 4] | Highlights from an insufficient film |
| Localization | Find the distal capillary row and follow a fixed route | Capturing areas outside the analyzable region |
| Pressure | Rest the device and adjust gradually until visibility is stable | Compressing enough to collapse capillaries [4, 5] |
| Immediate review | Check focus, coverage, and reflections before moving to the next finger | Assuming a poor image can be rescued later |
Step 5: name and store
An acquisition without correct labeling can easily be lost. Each image should be associated, at minimum, with patient, hand, finger, date, and study context. This requirement is especially important if the test is to be repeated during follow-up, or if the images will be reviewed by another person [5, 9].
Quality Control and Documentation
Quality is not just focus. An image may be sharp but still of limited use if it does not represent the distal capillary row or if it is unclear which finger it belongs to.
What an evaluable image should have
- Visible and recognizable distal capillary row.
- Sufficient focus to distinguish branches and apex.
- Controlled reflections and sufficient contrast.
- No collapse from excessive pressure.
- Correct identification of finger and laterality.
- Retrievable file for future comparison.
A review focused on practical problems in image assessment emphasizes that poor focus, poor localization, excessive pressure, and reflections are recurrent causes of non-evaluable or misleading studies [5]. This matters more than it may seem: an inexperienced operator may label as "low density" what is actually a poorly centered field or a compressed finger.
Insufficient magnification. The distal row is too small to assess morphology and density safely.
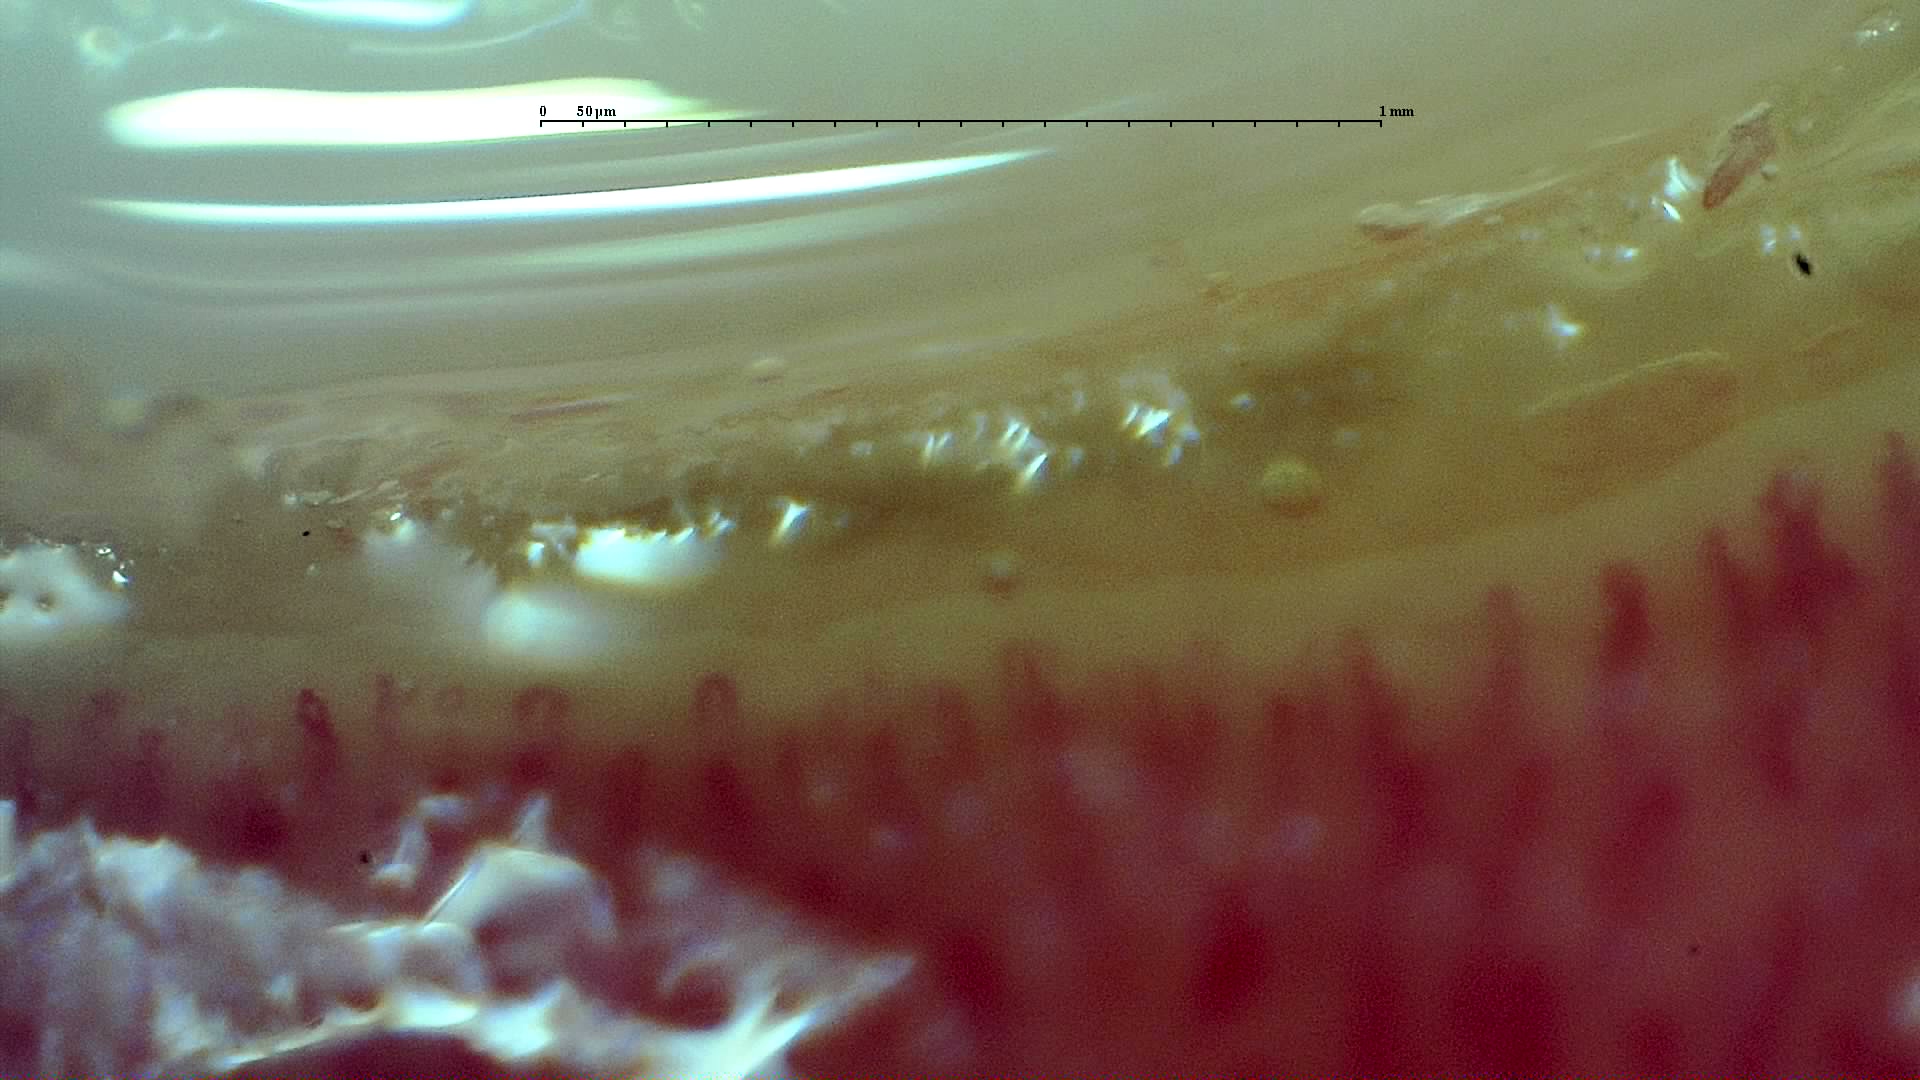
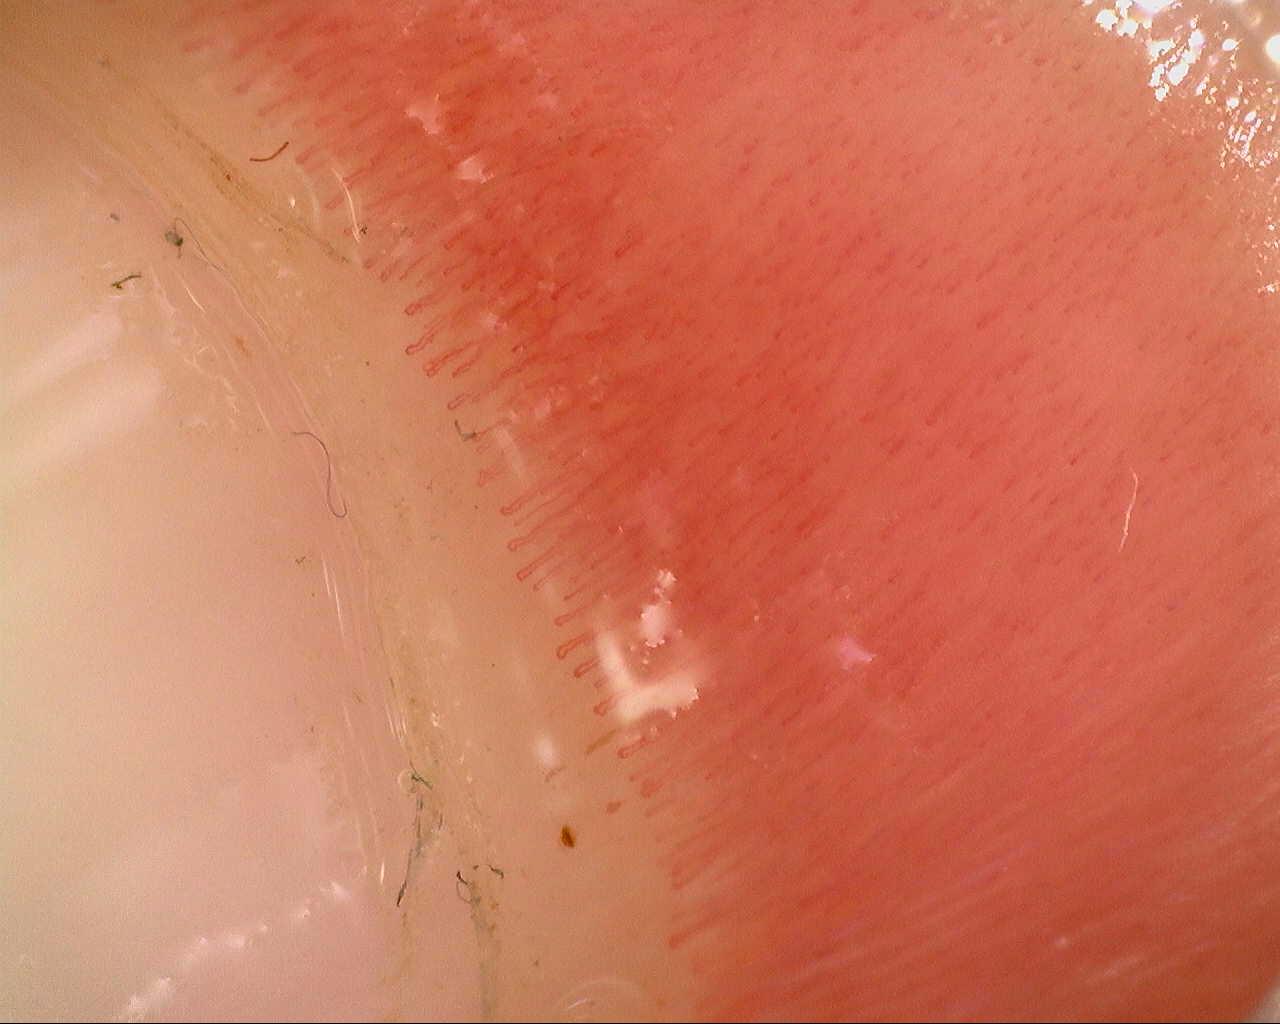
Poor focus. Capillary apices and branches lose definition even if the field appears partially visible.
Reflections. Specular highlights cover the analyzable area and may hide segments of the first row.
Combined low contrast. Darkness, poor focus, and reflections reduce interpretive confidence.
Unrecognizable row. The distal row cannot be identified safely and the field is not evaluable.

Overlapping artifacts. Reflections and poor focus coexist, making any quantification unsafe.
What should be documented in addition to the image
It is highly advisable to record study conditions: approximate room temperature, acclimatization time, relevant technical difficulties, and the reason for not examining any finger (apart from thumbs). The framework in which findings were obtained is considered as important as the findings themselves [9]. Having this information improves comparability and makes the report fit reality more closely.
| Documentation item | Why it should be recorded | Practical example |
|---|---|---|
| Number of fingers examined | Allows assessment of the study's true coverage | "Eight fingers; thumbs not examined" |
| Suboptimal conditions | Prevents overinterpretation of a difficult examination | "Cold hands at start; improvement after 20 minutes of acclimatization" |
| Reason for excluding a finger | Makes the limitation reproducible | "Left second finger not evaluable because of nail trauma" |
| Parameters analyzed | Clarifies whether there was description, quantification, or both | "Density, dilations, hemorrhages quantified, and morphology" |
Minimum Useful Quantification
Quantification should not become a routine without a defined purpose. It should answer a clinical question and always be applied with the same methodology.
For most clinical contexts, minimum useful quantification revolves around four groups of variables: capillary density, diameter or dilation, relevant morphology, and hemorrhages [1, 6]. Density is usually one of the most robust measurements, but only if it is always analyzed in segments of the same length and, crucially, in the correct row. Complex morphological descriptors add context, although they are more vulnerable to subjectivity when acquisition is irregular [5, 6].
| Variable | Practical utility | What to watch |
|---|---|---|
| Capillary density | Basis for structural follow-up | Comparable only when the row and length analyzed are homogeneous [1, 6] |
| Diameter and dilation | Help detect giant capillaries and early changes | Require good calibration [1, 6] |
| Hemorrhages | Provide information on fragility or microvascular activity | Confirm that they are not caused by trauma [4, 5] |
| Relevant morphology | Provides an overview of the global pattern | Best interpreted in context with density and other more objective measurements [5, 6] |
The aim is not to turn every examination into a research project. It is to generate minimum comparable data between visits. For example, if density, giant capillaries, and hemorrhages are recorded at the first examination, the coherent approach is to review those same domains at the next visit and not change the system halfway through follow-up.
Complementary Techniques
Advanced techniques expand information about perfusion or architecture, but today they should be understood as complements rather than substitutes for standard morphological capillaroscopy.
| Technique | What it adds | Current status |
|---|---|---|
| Infrared thermography | Functional information on perfusion and cold response | Useful as a complement in Raynaud's phenomenon; does not replace morphological study [1, 7] |
| Laser perfusion techniques | Dynamic flow signal | Greater physiological and research interest than universal clinical use [1] |
| OCT or OCTA | Microvascular architecture and vascular signal | Promising, but still transitioning from research to clinical practice [1, 8] |
OCT, optical coherence tomography; OCTA, optical coherence tomography angiography.
A 2023 systematic review on capillaroscopy and thermography in Raynaud's phenomenon concluded that both techniques are complementary: capillaroscopy provides information on structure and thermography on function, although methodological heterogeneity limits standardization of combined use [7]. For teaching purposes, this means that each answers a different question and therefore they should not compete with each other.
In optical coherence tomography angiography (OCTA), available studies have shown feasibility and good reproducibility in healthy subjects, but translation into routine clinical practice requires more validation and evidence that its value exceeds that of conventional capillaroscopy [8].
Short Clinical Scenarios and Frequent Errors
Acquisition failures tend to repeat themselves. Viewing them as concrete scenarios helps detect them before they "contaminate" the report.
Case 1: falsely low density due to compression
A patient with small hands and anxiety. The operator presses the device head too strongly to stabilize the image. Result: several capillaries seem to disappear and "low density" is described. When the acquisition is repeated with gentler support, the row becomes visible and the density changes. This error is very common among beginners [4, 5].
Case 2: traumatic hemorrhages after manicure
A patient is referred for mild Raynaud's phenomenon. The image shows small focal hemorrhages, but the cuticle is clearly manipulated and there are signs of recent manicure. Without this information, the report could overstate the finding. With it, the interpretation changes: the examination should be repeated at another time.
Case 3: poor follow-up practice
At the first visit, density is studied and hemorrhages are documented. At the second, only a few photographs are saved without identifying the finger, and the field of view also changes. Even with good images, follow-up loses comparability. The failure is not in the patient's biology but in the methodology.
Quick checklist for reproducible acquisition
- Temperature and acclimatization recorded before the study [2, 4].
- Eight fingers examined unless a justified technical limitation exists [2, 3, 10].
- Distal row scanned systematically and contiguously, always including medial and lateral fields [3, 5, 10].
- Immediate review of focus, reflections, and compression for each finger.
- File labeled by hand, finger, and date [5, 9].
FAQ
How long should the patient acclimatize?
Protocols usually work with at least 15 minutes of acclimatization in a thermally stable room [2, 4].
Should eight fingers always be examined?
This is the best-supported strategy to avoid losing sensitivity. Reducing the number of fingers examined can miss important information, especially in early disease, and reducing nailfold coverage can change systemic sclerosis pattern classification [2, 3, 10].
How many images are needed?
There is no single number for every indication. For systemic sclerosis pattern classification, the 2026 reference study supported acquiring 32 images, four fields per finger (two medial, two lateral) in the eight non-thumb fingers; in other scenarios, the important point is to cover the distal row with contiguous images and review quality immediately [4, 5, 10].
Which artifact ruins the most studies?
The combination of poor localization, poor focus, and excessive compression is probably the most clinically damaging [4, 5].
Should I quantify every image?
Not necessarily. You should quantify, with a consistent method, the variables you will actually compare or use clinically [1, 6].
Glossary
- Distal capillary row
- The distal row of aligned capillary loops that is the main target of morphological and quantitative analysis.
- Evaluable image
- Image with sufficient focus, localization, contrast, and labeling to allow reliable interpretation or measurement.
- Immersion medium
- Oil or gel applied to reduce reflections and improve visualization of the nailfold bed.
- Quantification
- Structured and repeatable recording of variables such as density, dilation, hemorrhages, or morphology.
- OCT
- Optical coherence tomography, an imaging technique used to study tissue architecture through coherence tomography.
- OCTA
- Optical coherence tomography angiography, a technique that combines structural and vascular information without direct contact.
References
- Smith V, Ickinger C, Hysa E, Snow M, Frech T, Sulli A, et al. Nailfold capillaroscopy. Best Pract Res Clin Rheumatol. 2023;37(1):101849. doi: 10.1016/j.berh.2023.101849. PMID: 37419757.
- Smith V, Herrick AL, Ingegnoli F, Damjanov N, De Angelis R, Denton CP, et al. Standardisation of nailfold capillaroscopy for the assessment of patients with Raynaud's phenomenon and systemic sclerosis. Autoimmun Rev. 2020;19(3):102458. doi: 10.1016/j.autrev.2020.102458. PMID: 31927087.
- Dinsdale G, Roberts C, Moore T, Manning J, Berks M, Allen J, et al. Nailfold capillaroscopy: how many fingers should be examined to detect abnormality? Rheumatology (Oxford). 2019;58(2):284-288. doi: 10.1093/rheumatology/key293. PMID: 30247696.
- El Miedany Y, Ismail S, Wadie M, Hassan M. Nailfold capillaroscopy: tips and challenges. Clin Rheumatol. 2022;41(12):3629-3640. doi: 10.1007/s10067-022-06354-1. PMID: 36040673.
- Karbalaie A, Emrani Z, Fatemi A, Etehadtavakol M, Erlandsson BE. Practical issues in assessing nailfold capillaroscopic images: a summary. Clin Rheumatol. 2019;38(9):2343-2354. doi: 10.1007/s10067-019-04644-9. PMID: 31278512.
- Herrick AL, Berks M, Taylor CJ. Quantitative nailfold capillaroscopy-update and possible next steps. Rheumatology (Oxford). 2021;60(5):2054-2065. doi: 10.1093/rheumatology/keab006. PMID: 33493310.
- Chaparro Del Moral R, Casado Días A, Mena-Vázquez N, Fernández-Nebro A, Ríos-Fernández R, de Ramón Garrido E, et al. Evaluation of Infrared Thermography and Nailfold Capillaroscopy Use in Patients with Raynaud's Phenomenon: A Systematic Review. Diagnostics (Basel). 2023;13(23):3494. doi: 10.3390/diagnostics13233494. PMID: 38067195.
- Dong W, Xie Y, Wang Y, Lu S, Li Y, Wang H, et al. Optical coherence tomography angiography and nailfold capillaroscopy in healthy subjects. Front Med (Lausanne). 2022;9:994406. doi: 10.3389/fmed.2022.994406. PMID: 36225149.
- El Miedany Y, Ismail S, Wadie M, Müller-Ladner U, Giacomelli R, Liakouli V, et al. Development of a core domain set for nailfold capillaroscopy reporting. Reumatol Clin (Engl Ed). 2024;20(7):345-352. doi: 10.1016/j.reumae.2024.07.003. PMID: 39160005.
- Guillén del Castillo A, Lledó-Ibáñez GM, Sáez Comet L, Freire Dapena M, Mesa Navas M, Martín Cascón M, et al. Value of nailfold capillaroscopy in the classification of the systemic sclerosis pattern. Med Clin (Barc). 2026;166:107426. doi: 10.1016/j.medcli.2026.107426. PMID: 42013567.